If you’re a photographer, your images should be ranking on Google.
But here’s the problem: most photographers spend hours perfecting their shots. Yet forget to optimize them for search.
That means your masterpiece might look incredible on Instagram.
…but it’s practically invisible on Google Images, where millions of people search for photos just like yours every single day.
That’s where Image SEO comes in.
In 2026, image SEO isn’t optional. It’s a business multiplier.
It helps your portfolio attract organic traffic, gets your work discovered by clients, and turns every photo into a lead generator.
In this guide, you’ll get a complete Image SEO checklist with 15 proven tactics, plus ready-to-use templates to help you rank faster without technical headaches.
Let’s dive in.
Why Image SEO Matters More Than Ever for Photographers
In 2026, Google has become more visual than ever before.
With tools like Google Lens and Multisearch, people now find services, products, and inspiration through images not just text.
That means your photography isn’t just art anymore, it’s data.
Every pixel can tell Google who you are, what you do, and where you work.
1. Visual Search Is Exploding
Here’s a wild stat: over 10 billion visual searches happen each month through Google Lens.
People snap a photo of something a wedding cake, a travel spot, a portrait style and Google find matching visuals and websites.
If your photos are optimized correctly, you can appear directly in those results. Right when someone is looking for the type of image you create.
Imagine a bride-to-be searching with Google Lens for “sunset wedding photos in LA.”
If your image file name is la-wedding-photographer-sunset.jpg and your alt text and metadata match, your photo could show up first leading her straight to you.
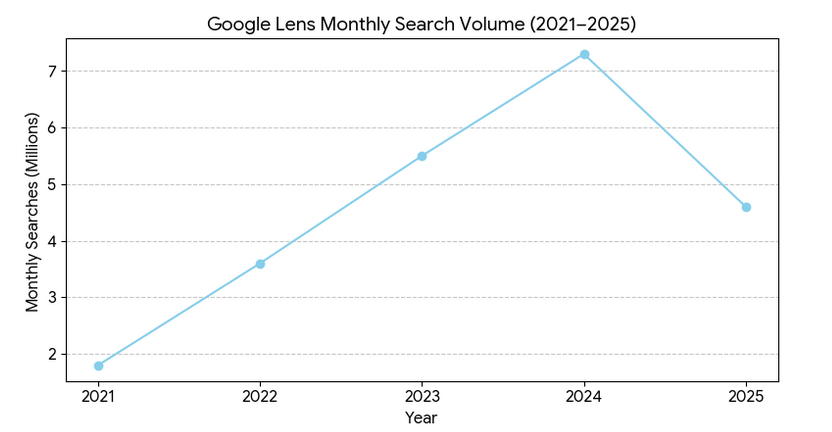
That’s not theory. It’s happening right now to photographers who treat image SEO seriously.
2. Google Understands Photos (Better Than Humans)
Gone are the days when search engines just “read” words.
Now, with AI-driven image recognition, Google can understand objects, faces, emotions, and even photography styles.
If you upload a black-and-white portrait of an elderly man, Google can detect that it’s “a monochrome photo of an elderly male, close-up, with emotion.”
It then compares your photo with similar ones across the web.
But here’s the key insight:
Google doesn’t just rely on your image. It also uses:
- The file name (e.g., emotional-portrait-elderly-man.jpg)
- The alt text
- The caption and surrounding paragraph
- The EXIF metadata (camera model, GPS, date, etc.)
- The page context (your page title, H1, and nearby text)
When all of these elements align, Google instantly knows:
“This image belongs to a professional portrait photographer in Singapore who specializes in emotional storytelling.”
That’s how you build topical authority through your photos.
3. Clients Search Differently Than You Think
Here’s what most photographers miss: your clients don’t Google “great composition portrait photographers.”
They Google “baby photoshoot near me” or “real estate photographer for Airbnb.”
Your images, if optimized correctly can show up before your website even ranks.
That’s the power of image SEO.
Visual search shortens the discovery journey.
Someone clicks on your image → lands on your portfolio → fills out your contact form.
Boom. Organic client acquisition.
4. Data Doesn’t Lie
According to recent studies, pages with optimized visuals get:
- 94% more views than text-only content
- 32% higher engagement rates
- Up to 48% faster indexing speed in Google Images
In other words, photographers who optimize every shot for SEO aren’t just ranking better. They’re booking more clients.
How Google Understands Images (in Plain English)

If you’ve ever wondered, “How does Google actually see my images?”. You’re not alone.
Let’s break it down in simple terms.
Step 1: Google Crawls the Image File

When Googlebot visits your page, it scans for <img> tags.
If it finds an image, it checks:
- The file name
- The image size
- The alt attribute
- The caption
- And whether it’s lazy-loaded or not
If you’ve done this right, Google now has clues about what the image represents.
Step 2: It Reads the Surrounding Content
Google doesn’t look at your photo in isolation.
It reads the headline, paragraphs, and anchor text near the image.
Example:
If your photo sits next to a paragraph that says:
“Check out these dreamy pre-wedding shots taken in LA.”
Then Google associates your image with “pre-wedding photography in LA.”
That’s why context is everything.

Step 3: It Uses Vision AI to Analyze the Image Content
Here’s where the magic happens.
Google runs your photo through its Vision AI model to identify what’s inside.
It detects:
- People (faces, gender, age group)
- Objects (cars, flowers, cameras, dresses)
- Locations (beach, mountain, studio)
- Lighting and colors (sunset, bright, moody)
- Even emotions (happy, serious, romantic)
It then cross-checks these signals with the text clues you’ve provided.
If everything matches, Google rewards your image with higher relevance scores and that’s what gets you ranking in Google Images, Lens, and Discover.
Step 4: It Evaluates Performance
Once your photo is indexed, Google tracks engagement metrics:
- How often people click your image
- How long they stay on your page
- Whether they bounce or explore more
If your image performs well (good CTR, low bounce), Google pushes it higher in search results. Just like it does with blog posts.
Quick Test: See What Google Sees in Your Photos
Want to know how Google interprets your images?
Try this simple test:
- Go to Google Cloud Vision AI Demo (free tool).
- Upload one of your photos.
- See what labels Google detects.
If the labels match what you want to rank for (e.g., “wedding,” “couple,” “photography”), great job. Your photo is on the right track.
If not, it’s time to fix the filename, alt text, and context.
Pro Tip:
Add your main keyword once in the filename and once in the alt text but make it sound natural.
Think human-first, algorithm-second.
The 15-Step Image SEO Checklist (with Templates)
Alright now that you understand how Google actually “sees” your photos, it’s time to optimize every single image on your website, portfolio, and blog using these 15 must-do tactics.
These aren’t random tips. They’re tested, data-backed, and used by top photography sites that consistently rank on the first page of Google Images.
Let’s dive into each tactic, complete with templates, tools, and examples.
1. Use Descriptive, Keyword-Rich File Names
Your camera saves files like IMG_00123.JPG.
Google hates that.
Instead, rename your photos before uploading them.
Use clear, keyword-driven filenames that describe what’s in the photo.
Bad:
IMG_0456.jpg
Better:
LA-street-photography-night-neon.jpg
Best (Template):
[location]-[subject]-[style or emotion].jpg
Example:
LA-wedding-photographer-sunset-portrait.jpg
This simple tweak helps Google instantly identify what your photo represents and where it belongs.
Pro tip: Keep filenames short (under 60 characters) and use hyphens, not underscores.
2. Optimize ALT Text Like a Human Caption (Not a Keyword Dump)

ALT text exists to describe your image not to stuff it with keywords.
It helps visually impaired users, improves accessibility, and gives search engines context.
Here’s the winning formula:
Template:
“A [adjective] photo of [subject] taken by [photographer name] in [location].”
Example:
“A romantic photo of a newlywed couple taken by [ photographer name] in LA during sunset.”
That sounds natural, descriptive, and keyword-rich exactly what Google loves.
✅ Keep it under 125 characters
✅ Include your main keyword once
✅ Avoid words like “image of” or “photo of”. Google already knows it’s an image
Compress Images Without Killing Quality
Page speed is a ranking factor. If your portfolio loads slowly because of heavy files, Google will penalize you.
Your goal:
Keep each photo under 200 KB (for web use) without visible quality loss.
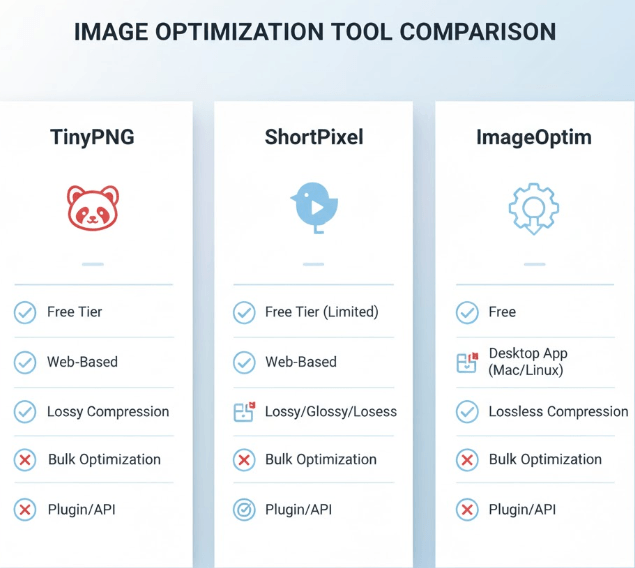
Recommended tools:
Each of these tools can reduce file size by up to 70% without pixel distortion.
Pro Tip: For WordPress users, install the ShortPixel plugin and set it to automatically compress images upon upload.
4. Choose the Right File Format (JPEG, PNG, WebP, AVIF)
Different formats serve different purposes:
Format | Best For | Pros | Cons |
|---|---|---|---|
JPEG | Photo | Small size, decent quality | Loses detail with heavy compression |
PNG | Logos, transparent images | Crisp, supports transparency | Larger size |
WebP | Modern web images | Best compression ratio, supported by all browsers | Requires conversion |
AVIF | Next-gen format | Even smaller than WebP, ultra-sharp | Not yet universal |
If you want the perfect balance between quality and speed, go with WebP.
Use a converter like Squoosh or CloudConvert to batch-convert all images.
5. Resize Images for Different Devices
A 4000px-wide image is overkill for mobile users.
Responsive images ensure your photos look sharp on all screens without slowing down your site.
HTML Template:
<img
src=”portrait-1200.jpg”
srcset=”portrait-600.jpg 600w, portrait-1200.jpg 1200w, portrait-2000.jpg 2000w”
sizes=”(max-width: 600px) 100vw, 50vw”
alt=”Black and white portrait of a man in studio lighting”
/>
This tells browsers:
“Serve smaller images on small screens, bigger ones on desktops.”
Result → Faster load time, better SEO, and happier users
6. Add Image Captions Strategically
Most people skip captions — huge mistake.
Studies show that captions are read 300% more often than body text.
That’s prime real estate for keywords and context.
Example:
“LA beach wedding shoot by [photographer name], captured with Canon EOS R5.”
Rules of thumb:
- Keep captions 1–2 sentences max
- Include your target keyword naturally
- Don’t repeat your ALT text word-for-word
Captions not only add context for Google but also boost engagement time a behavioural SEO signal.
7. Add Structured Data (ImageObject Schema)
Structured data (aka schema markup) helps Google understand and display your images in rich results.
Here’s a simple JSON-LD template:
{
“@context”: “https://schema.org”,
“@type”: “ImageObject”,
“contentUrl”: “https://yourdomain.com/images/bali-wedding-photographer-sunset.jpg”,
“creator”: {
“@type”: “Person”,
“name”: “Moshiur Rahman”
},
“creditText”: “Photo by Moshiur Rahman”,
“license”: “https://creativecommons.org/licenses/by-nc/4.0/”,
“acquireLicensePage”: “https://yourdomain.com/contact”
}
Add this snippet to the <head> of your photo page.
It signals to Google that your image is original, high-quality, and licensed — giving you an SEO edge.
8. Leverage EXIF Metadata Smartly
EXIF data (Exchangeable Image File Format) includes hidden info: camera model, focal length, GPS coordinates, and more.
You can use this strategically to add SEO-friendly context.
Recommended fields to keep:
- Camera model
- Copyright
- Photographer name
- GPS (if location relevant)
You can edit EXIF data with Lightroom, Photoshop, or free tools like ExifTool.
Example: Add GPS data to a photo taken at Marina Bay Sands- now Google associates your image with Singapore travel photography.
Just don’t overdo it- remove unnecessary data like timestamps or serial numbers.
9. Build an Image Sitemap
If Google can’t find your images, it can’t rank them.
That’s where an image sitemap helps.
You can generate one automatically using:
- Yoast SEO (WordPress plugin)
- Rank Math (adds images to your sitemap automatically)
- Or create one manually with XML code
Example (manual sitemap entry):
<url>
<loc>https://yourdomain.com/gallery/LA-wedding</loc>
<image:image>
<image:loc>https://yourdomain.com/images/LA-wedding-photographer-sunset.jpg</image:loc>
<image:title>LA Wedding Photographer Sunset</image:title>
</image:image>
</url>
Then submit your sitemap to Google Search Console → Sitemaps.
That’s how you make sure every image gets indexed.
10. Use Lazy Loading for Faster Page Speed
Lazy loading delays loading images until they’re visible on the user’s screen — dramatically improving load times.
Add this attribute to your <img> tag:
<img src=”photo.jpg” alt=”Travel photography in Nepal” loading=”lazy” />
Or, if you’re using WordPress, simply enable lazy load in your caching plugin (WP Rocket, LiteSpeed, etc.).
Result: Up to 40% faster page loads and better Core Web Vitals scores — which Google rewards directly.
Pro Tip: Combine lazy loading with WebP compression for the ultimate speed-SEO combo.
11. Optimize Thumbnails and Featured Images for Clicks
Your thumbnail is your “ad” on Google Images — it determines whether someone clicks or scrolls past.
Even if you rank high, a low click-through rate (CTR) can drop your position.
Here’s how to optimize thumbnails for higher engagement:
Use contrast and brightness wisely.
High-contrast thumbnails pop out against Google’s white background.
Avoid cluttered compositions.
Simple subjects draw more clicks.
Add subtle branding.
A faint watermark or corner logo improves brand recall without distracting from the photo.
Match aspect ratios.
Google prefers 4:3 or square formats for web display.
Pro Tip: Test different featured images for your blog posts using Google Search Console’s “Performance → Image” report.
If one thumbnail consistently earns more clicks, replicate that style across your portfolio.
12. Use a CDN (Content Delivery Network) for Faster Global Delivery

Image SEO isn’t just about metadata. It’s about speed.
If your clients are worldwide, your images need to load instantly in every region. That’s where a CDN comes in.
A Content Delivery Network stores copies of your images on multiple servers around the world.
When someone visits your site, the image loads from the closest server.
Top CDN providers for photographers:
- Cloudflare (Free plan available)
- BunnyCDN (Excellent for high-resolution portfolios)
- Amazon CloudFront
- ImageKit.io (Includes on-the-fly resizing & compression)
Results you can expect:
- Up to 60% faster image load times
- Reduced bounce rates
- Higher engagement metrics (time on page ↑ = SEO boost)
Implementation Tip: If you use WordPress, CDNs integrate easily through plugins like WP Rocket, W3 Total Cache, or the official Cloudflare plugin.
13. Watermark Images Without Hurting SEO
You want to protect your work, but overdone watermarks can kill your SEO (and user experience).
Here’s the golden rule: make your watermark visible, but subtle.
✅ Place it in a corner, not across the center
✅ Keep opacity between 20–40%
✅ Include your brand name or website URL (e.g., moshiurrahmanphoto.com)
✅ Avoid covering faces or key subjects
Recommended tools:
- Lightroom Watermark Presets
- Canva (Batch watermarking)
- BatchPhoto (for bulk automation)
Pro Tip: Watermark your images after resizing and compressing. That way, the watermark stays crisp even on small screens.
14. Use Consistent Image Templates for Brand Identity
This one’s overlooked by 99% of photographers. Yet it’s powerful.
Consistent templates help search engines connect your work visually.
If your photos share similar dimensions, color palettes, and typography overlays, Google starts associating them with your brand.
It’s the same principal YouTubers use with thumbnails, visual consistency = brand recall.
How to do it:
- Create a reusable template in Canva, Photoshop, or Figma
- Use the same border style, logo position, and tone
- Save naming patterns like [photographer name]-[theme]-[location].webp
Example:
A series of travel photos all following the same frame design and naming convention will build visual authority and help your domain dominate certain queries (e.g., “LA street photography”).
Template Tip:
Create three template types:
- Portfolio hero images (for galleries)
- Blog feature images
- Social sharing images (1200×630 px, optimized for Open Graph tags)
That last one is crucial for social-SEO synergy. When people share your blog posts, Facebook and LinkedIn pull the right preview image automatically.
15. Track Image Performance with Google Search Console
You can’t improve what you don’t measure.
Google Search Console (GSC) lets you see which of your images are bringing traffic — and which ones need work.
Here’s how:
- Open Search Console → “Performance.”
- Click on the “Search Type” filter → select Image.
- Now you’ll see impressions, clicks, and CTR for all indexed images.
You can analyse:
- Which keywords triggered your photos
- Which pages contain top-performing images
- Which countries your images appear in
Actionable tip:
Identify your top 10 images with the highest impressions but low CTR.
Then update their captions, alt text, or thumbnails to make them more clickable.
Bonus: Use Google Analytics → Behavior → Site Content to see how image-heavy pages perform in terms of engagement.
Common Image SEO Mistakes Photographers Make (and How to Fix Them)
Even seasoned photographers slip up on the basics. Let’s make sure you don’t.
1. Keyword-Stuffing ALT Text
Example: “wedding photographer bali bali bali pre-wedding photoshoot.”
Fix: Write for humans, not bots. One keyword is enough.
2. Uploading Uncompressed RAW Files
RAW = great for editing, terrible for web.
Fix: Export in WebP or JPEG, 200–300 KB max.
3. Ignoring File Names
Default camera names tell Google nothing.
Fix: Use descriptive, keyword-rich names like singapore-night-portrait.jpg.
4. No Mobile Optimization
A 4K desktop image will suffocate mobile users.
Fix: Use responsive image code (srcset) or an adaptive image plugin.
5. Forgetting to Build an Image Sitemap
Without it, Google may index your text but skip your visuals.
Fix: Enable automatic image sitemaps in Rank Math or Yoast.
Downloadable Templates & Tools for Photographers
To save you time, here’s a quick reference list of templates you can recreate:
Template Type | Description | Format |
|---|---|---|
ALT Text Generator | Fill-in-the-blank captions that follow best practices | Google Sheet |
Image Filename Formula | Auto-creates SEO-friendly filenames | Excel / Sheet |
Compression & Resize Checklist | Ensures every image is web-ready | |
Structured Data Snippet | JSON-LD copy-paste template | Code |
EXIF Metadata Sheet | Which fields to keep/remove |
Optional download CTA idea:
“Want all these templates? Grab the free Image SEO Toolkit (Google Sheets + JSON templates) below.”
This approach builds authority and collects email leads.
Final Thoughts: Turn Every Photo into a Search Magnet
Image SEO isn’t just for techies. It’s for any photographer who wants their art seen, shared, and sold.
By following this 15-step checklist, you’ll:
- Load faster than your competitors
- Rank higher in Google Images
- Protect and brand your work
- Turn visuals into organic leads
The best part? Once you set these systems up compression, metadata, templates. They run on autopilot.
Start small: pick one photoshoot today, apply these tactics, and track results in Search Console next week.
Remember: great photography gets attention; optimized photography gets traffic.